Using pymunk (physics engine) in NodeBox
NodeBox makes a great environment for data visualizations and generative art. It's easy to get started in and you get basic drawing, type, and image manipulation. When you're ready for more, it's not too difficult to bring in external Python libraries to connect NodeBox to other systems or add physics and particle simulation to spice up your visuals.
For those unfamiliar with NodeBox,
"NodeBox is a Mac OS X application that lets you create 2D visuals (static, animated or interactive) using Python programming code and export them as a PDF or a QuickTime movie."
It uses PyObjC to embed a Python runtime into an OS X native application, and fits into the same toolbox as Processing and maybe openFrameworks. It's a bit slow to run complex animations in, but you're coding in Python, you get the gorgeous fonts and anti-aliasing you'd expect on OS X, and it provides easy access to some OS X native libraries, like Core Image. For a quick look at what it can do, check out the NodeBox gallery.
NodeBox includes it's own Python build, which is nice for portability and reliability, but it uses a custom sys.path that doesn't look for Python packages you might already have installed on your system. There are a few ways to deal with this:
- You can install your packages into NodeBox's path, ie.,
~/Library/Application\ Support/NodeBox/-- meaning that you can use them from NodeBox, but not from other scripts... - You can
import sysin your NodeBox code and manually modify thesys.pathvalue to add your existing packages... - You can install packages into your system site-packages directory and sym-link them from NodeBox's directory...
- You can make NodeBox use your system packages instead of it's own by sym-linking
~/Library/Application\ Support/NodeBoxto your site-packages directory of choice (ex.,/Library/Python/2.5/site-packages)
For this exercise, I'll be adding pymunk (Python bindings for the Chipmonk physics library) to NodeBox using option #3: Installing pymunk globally and sym-linking from NodeBox's package directory. This allows me to run the pymunk examples from the command-line (which use PyGame and Pyglet) but still use it from NodeBox. This may not always be the best solution, so you'll have to pick what's right for your needs.
Let's get started.
Pymunk (at the time of writing) includes it's own copy of the Chipmunk source code, making this whole process rather easy. Once you've downloaded and uncompressed the pymunk source, cd into it's directory and build chipmunk using:
> python setup.py build_chipmunk
Now you can build and install pymunk:
> python setup.py install
This will install an egg (which I normally hate dealing with, but that's another story.) If you don't want the egg, just copy the pymunk directory into your site-packages.
Now we'll add pymunk to NodeBox's path. My pymunk is in /Library/Python/2.5/site-packages/, so I'll:
> cd ~/Library/Application\ Support/NodeBox
> ln -s /Library/Python/2.5/site-packages/pymunk-0.8.1-py2.5.egg/pymunk .
Finally, NodeBox needs access to libchipmunk. I used this approach:
> cd /Applications/NodeBox/NodeBox.app/Contents/MacOS/
> ln -s ~/Library/Application\ Support/NodeBox/pymunk/libchipmunk.dylib .
We should be done! Fire up NodeBox and try an include pymunk to see if it loads. If you don't see any error messages, you're good to go.
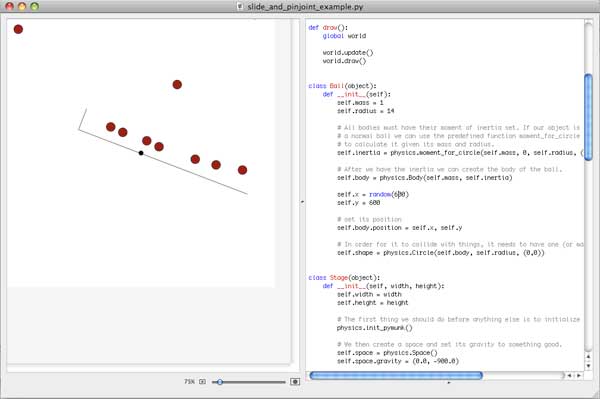
If you're new to pymunk (as I was until this week) head over to the Slide and Pin Joint tutorial to see how it works. The example is written for PyGame so you'll be doing a little rewriting to bring it into NodeBox.
The following screenshot shows the Slide and Pin Joint demo within NodeBox using my take on porting it. I'm having a little trouble with the slide joint, but you can check out my code if you're curious: slide_and_pinjoint_example.py