Texas heat and a coolant leak
Somehow I always end up working on the car during my holidays, and this past week was no exception. It's been hovering somewhere around a million degrees in Texas for much of July, and with heat-soaked concrete and traffic jams, the temperatures can be a little harsh on our combustion-powered friends. Upon returning home on Sunday, my Subaru promptly expelled it's coolant into a stinky mist of boiling fluid dumped onto the exhaust manifold. (Fortunately, the car had returned home unharmed before launching this little performance, since the carburetor gods have been less friendly to a few other folks I know. Over the past week, two have had their radiators blow, and one killed an engine [overheating so far as to melt some plastic bits in the engine bay and ruin the heads.])
Expecting the worst, I waited for the car to cool down, then popped the hood to have a look around. Puddles of coolant stood in every nook of the front-right corner of the engine bay, though the source of the leak eluded me. I was at least expecting to see a blown hose, but unfortunately, everything looked just fine. Since I knew that more probing was needed, I pushed the car into the garage to let it completely cool overnight.
The next morning it was time to call in reinforcements. In this case, they came in the form of a Snap-on Cooling System Tester. It's not uncommon for a coolant leak to only happen under pressure, so a cooling system tester can be used to pressurize the system. The device is pretty simple -- it's just a hand pump, but it's crucial for testing hoses and fittings. (Thanks for letting me borrow the tester Rob!)
The pictures below show the process:
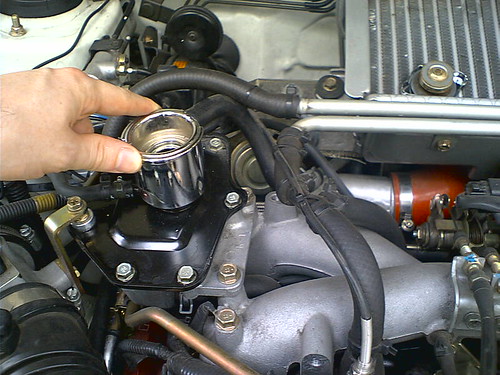
Step 1: Pop the radiator cap from a completely cooled engine:

Step 2: Attach the right adapter...
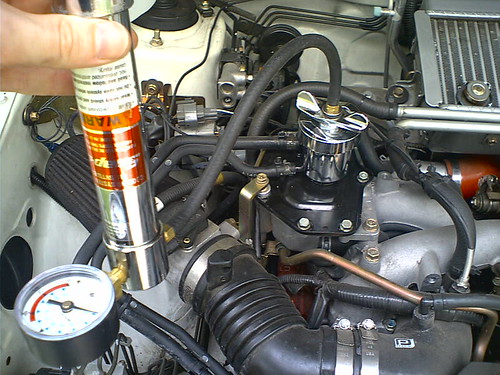
Step 3: Attach the pump, and pump it. Watch the pressure gauge and don't exceed the pressure your system is likely to run. In my case, I didn't want to exceed 15 psi (~1.1 bar.)
Step 4: Watch the coolant spray out the pin-hole leak like a fountain!
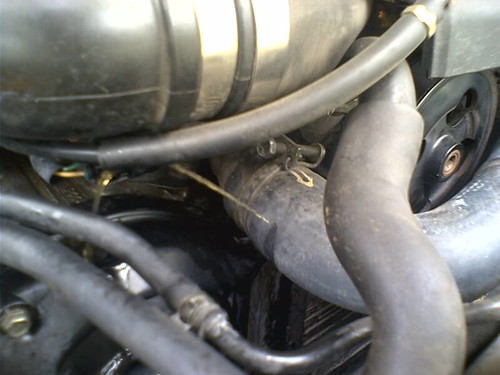
As you can see in the pictures, the leak was pretty easy to find with the right tools, but would have been extremely difficult without them. Fixing it was even easier, and it gave me a nice excuse to flush the system and replace the other hoses as well (I went with higher-strength hoses for the replacements.) Also of note, you may have noticed in the pictures that I'm running a high-pressure radiator cap. (The STi cap is rated 1.3 bar.) This may have caused the blown hose, so do be aware of this when swapping caps.
If you'd like to replicate this at home, remember that automotive coolant is considered toxic once it's been run in an engine. Always wear protective gloves when working with automotive fluids, and recycle them appropriately. (See the EPA page on Antifreeze for more on this.)
[Update] Since this repair, the radiator lasted another year before also developing a crack and blowing coolant all over the engine bay. The stock WRX radiator features a plastic top, which was the failure point for mine. Since all the coolant hoses were replaced with high-strength lines, that plastic top may have simply been the next weakest link in an over-pressurized coolant system. Now that the car has an all-aluminum radiator, I'm curious where the next weakest link might turn up (hoping that it's not catastrophic!)